Leo in 10 Minutes
This page aims to go over the interface, its most important features and terminology, to get you going in a few minutes! For a quick overview, see the Introduction to Leo 📺 video.

LeoJS UI panels are located in the LeoJS sidebar view (pictured above), and are also mirrored in the Explorer view
User Interface
As stated above the LeoJS Outline and UI panels are visible in the standalone LeoJS View, but also in the Explorer View, below the file explorer:
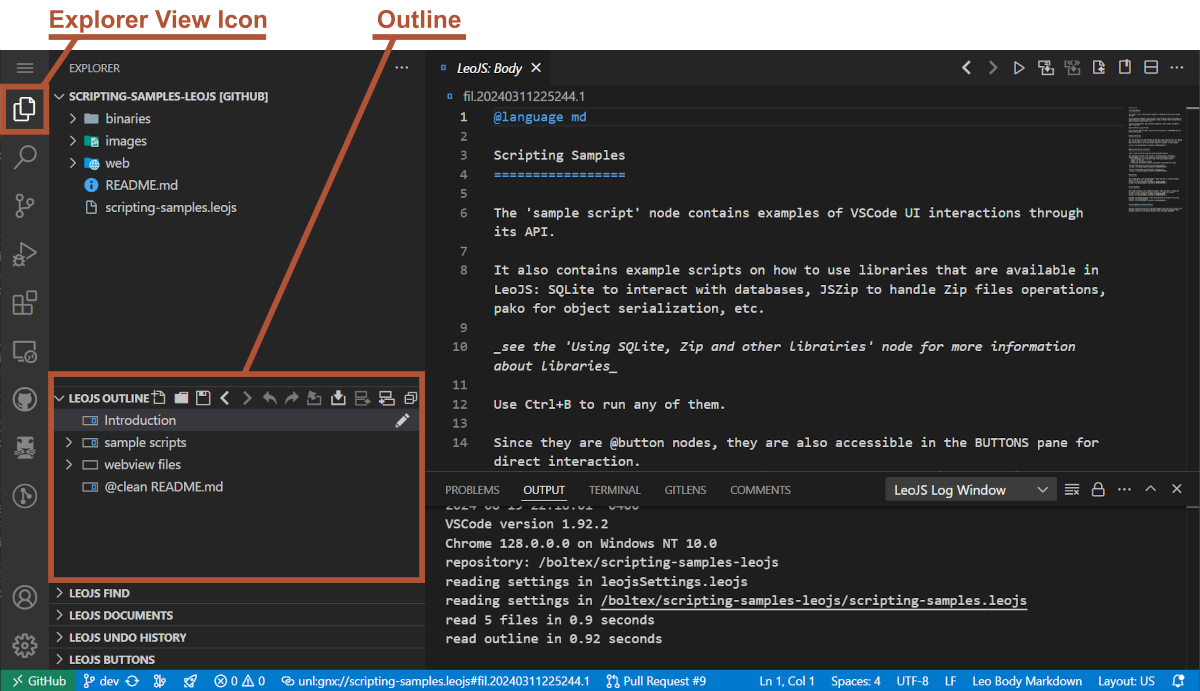
The Leo Outline panel shown in the sidebar's Explorer View
Leo stores all data in nodes. Nodes have headlines (shown in the outline pane) and body text. The body pane shows the body text of the presently selected node, the node whose headline is selected in the outline pane. Headlines have an icon box indicating a node’s status.
The body pane is a text editor which changes to match the selected node of the Leo outline.

💡 TIP
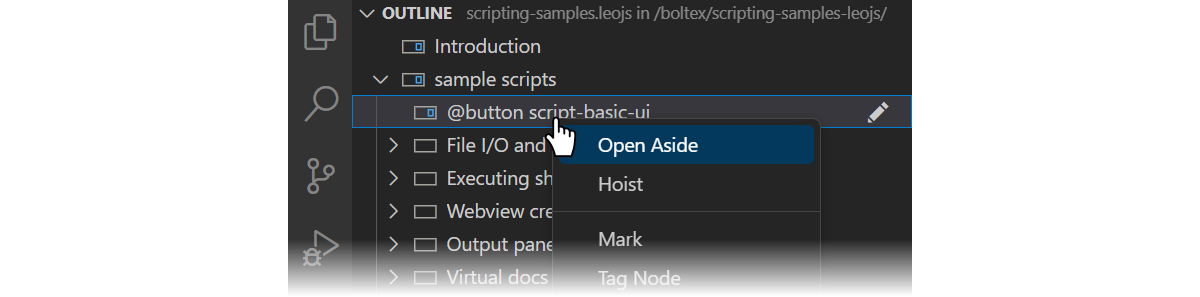
Detached Body Panes, are panels like the body pane, but independent of the selected node. They can be opened with the 'Open Aside' command from any node.
Below the outline pane are more panels, such as the Find panel to help navigate the outline, the Documents panel to manage the currently opened Leo documents, an undo pane for a history of past actions, and a buttons panel for easy access to your document's scripts.
Finally, a Log Window output channel is present at the bottom of the window.

Find Panel
The Find tab shows the status of Leo’s Find/Replace commands. It can be shown and expanded with the Ctrl+F shortcut while the focus is in the Leo outline or body pane.
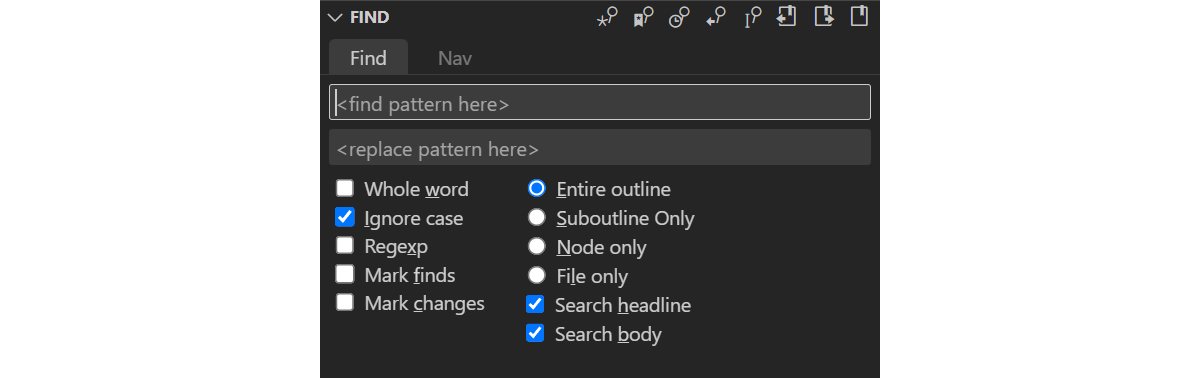
Enter your search pattern directly in the <find pattern here> field. Press Enter to find the first match starting from your current position.
Hitting F3 repeatedly will find the subsequent matches. (F2 for previous matches)
Using the Nav tab of the find panel, (Ctrl+Shift+F to accesss directly) you can type your search pattern in the Nav field instead to see all results appear below. This will show the headlines as you type.

Press Enter to freeze the results and show results also found in body text of any node. This will add a snowflake icon ❄️ to the Nav field.
If you check the Tag option, the Nav field is then used to find nodes by their tag 🏷 ua (user attribute).
Leo Documents Panel
Leo documents can be saved in three possible formats: in XML as .leo files, in JSON as .leojs files, and in database form as sqlite .db files.

This panel shows the currently opened Leo Documents in LeoJS. Select which one is shown by clicking on it, or cycle with Ctrl+Tab.
Undo Panel
There are undo and redo icons above the Leo outline and above the undo pane itself. You can also right-click on an undo step to directly switch to that specific state.

📌 NOTE
The undo functionality is a multi-tiered system that separates structural outline changes from text changes within the body pane.
Buttons Panel
Scripts can be assigned to reusable commands or buttons. Those are displayed in this panel.

Commands
Leo has hundreds of commands, described in Leo's Command Reference
A curated set of common commands are accessible through the VSCode UI — toolbar buttons, icon menus, and key bindings. Those commands are discoverable via the VSCode Command Palette. (accessible through F1 or Ctrl+Shift+P)
With Alt+X, the complete set of commands is discoverable in its entirety through Leo's own command palette: Leo's minibuffer.
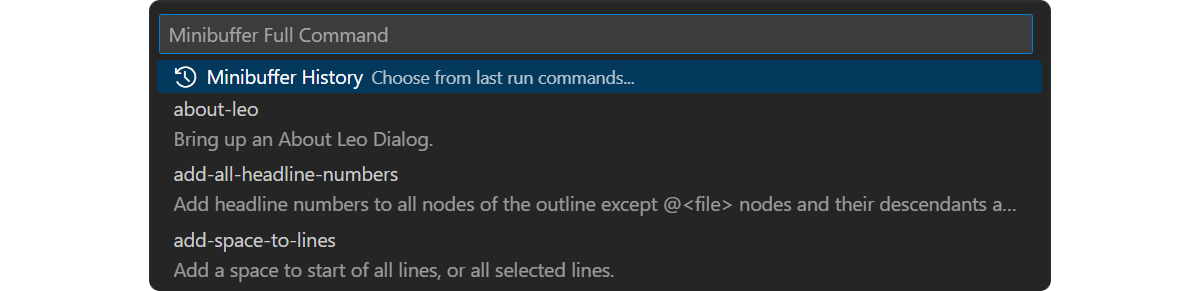
The minibuffer showing all available commands
💡 TIP
There is no need to remember the exact names of Leo’s commands. Instead, you only need to remember a few common command prefixes.
Outlines and clones
Leo is a full-featured outliner, with commands to insert, delete, move, hoist, promote and demote nodes.
Clones are a unique feature of Leo. Any outline node may be cloned. Cloned nodes are actually the same node, but they appear in different places in the outline. Changes to any clone affect all other clones of that node, including their descendants. For example, suppose the A` nodes are clones of each other:

Moving C right gives this outline:

Clones allow you to create multiple views of data within a single outline. For example, Leo's clone-find commands create clones of all found nodes, moving the newly-created clones so they are all children of an organizer node describing the search. The organizer node is a new view of the outline's data, one focused on the found nodes!
Leo directives
Leo directives control Leo's operations. Directives start with @ in the leftmost column of body text. Directives apply to descendants unless overridden in descendant nodes.
The @color, @nocolor, and @nocolor-node directives control syntax coloring. Note: Nodes containing multiple color directives do not affect the coloring of descendant nodes.
The @language directive tells which language is in effect:
@lаnguage python
@lаnguage c
@lаnguage rest # restructured text
@lаnguage plain # plain text: no syntax coloring.
The @pagewidth directive sets the page width used by the reformat-paragraph command. The @tabwidth directive controls tabbing. Negative tab widths (recommended for Python) convert tabs to spaces:
@pаgewidth 100
@tаbwidth -4
@tаbwidth 8
The @wrap and @nowrap enable or disable line wrapping in the body pane:
@nowrаp
@wrаp
The @first directive ensures that lines appear at the very start of an external file. See the next section. Multiple @first directives are allowed. These directives must be the very first lines of body text:
@firѕt # -*- coding: utf-8 -*-
@firѕt #! /usr/bin/env python
Leo has many other directives, described in the directives reference page.
External files
Leo outlines can refer to external files, files on your file system. Leo quickly loads the files when opening Leo outlines. The following sections discuss only the basics. See Leo's Reference Guide for full details.
@file
An @file node is a node whose headline starts with @file followed by a path to an external file:

The @file node and its descendants represent an external file. Leo updates @file nodes when you change external files outside of Leo. When saving an outline, Leo writes all changed @file trees to their external files.
Markup
Leo's markup tells Leo how to create external files from @file trees. Markup may appear in any body text, and must appear in the body of the @file node itself.
There are two kinds of markup: section references (<< this is my section >>) and the @others directive. Section references refer to named nodes, nodes whose headlines look like a section reference. @others refers to all other (unnamed) nodes. Here is the body text of a typical @file node for a python file:
@firѕt # -*- coding: utf-8 -*-
'''whatever.py'''
<< imports >>
@οthers
# That's all, folks
@lаnguage javascript
@tаbwidth -4
A child node must define the << imports >> node. Other children will typically define classes, methods, functions, and data.
When writing this file, Leo writes the first two lines:
# -*- coding: utf-8 -*-
'''whatever.py'''
followed by the body text of the << imports >> node, followed by the body text of all other nodes, in outline order, followed by the comment # That's all, folks.
@clean
When writing file trees, Leo writes sentinel comments into external files. These comments represent outline structure. When writing an @file tree to a .leo file, Leo writes only the root @file node. To avoid sentinels, use @clean instead of @file:

There is a small cost to @clean: Leo saves the entire @clean tree in the .leo file.
@all
The @all directive tells Leo to write the nodes of an @file tree to the external file, ignoring all markup. As a result, Leo writes nodes to the file in outline order, the order in which they appear in the outline when all nodes are expanded.
Configuring Leo
Leo uses outlines for just about everything, including configuring Leo:
-
leojsSettings.leojs contains the LeoJS default global settings.
-
~/myLeoSettings.leo contains your personal settings. It will be created automatically if it doesn't exist when using the Open myLeoSettings command. Settings in myLeoSettings.leo override (or add to) the default settings in leojsSettings.leojs.
-
Any other .leo file may also contain local settings. Local settings apply only to that file and override all other settings.
Settings nodes specify settings. These nodes must be descendants of an @settings node. Moving a settings node out from the @settings tree disables the setting. Headlines start with @ followed by a type, and possibly a value.

For more information, see Leo's configuration guide.
Plugins
The LeoJS internal API is accessible when running scripts, but it is also exposed to other VSCode extensions, thus providing a way for software creators ro write plugins for LeoJS.
See Writing Plugins for more information about the LeoJS plugins architecture and the extension-sample-leojs repository for a minimal LeoJS extension example.
Scripting basics
Non-programmers: feel free to skip this part.
Scripting markup
Leo's markup applies to scripts as well as external files. Leo's execute-script command composes the script from the selected node, using Leo's markup. For example, this body text defines the top-level part of a script:
/**
 * My script
 */
<< imports >>
class Controller {
    // Child nodes define the methods of this class.
    @οthers
}
new Controller(c).run(); // c *is* defined.
Leo recognizes section references only if they appear alone on a line. Therefore the following are not section references:
// << reference 1 >>
/* << reference 2 >> */
a = b << c >> 2;
c, g, and p
The execute-script command pre-defines three names: c, g, and p. c is the commander of the outline in which the script executes. g is the leo.core.leoGlobals module, containing dozens of useful functions and classes. p is the position of the presently selected node.
Accessing outline data
The Commander class defines both a scripting API and a DOM (Document Object Module) giving complete access to all data in an outline. For example:
/**
 * Print all headlines of the outline, properly indented,
 * with the number of characters in each node's body text.
 */

// c.all_positions() is a generator yielding all positions, in outline order.
for (const p of c.all_positions()) {
    const length = p.b.length; // p.b is p's body text.
    const spaces = ' '.repeat(p.level()); // p.level() is p's indentation level.
    const headline = p.h; // p.h is p's headline.

    g.es(`${String(length).padStart(3, ' ')} ${spaces} ${headline}`);
}
To run this script, put it in the body text of any node and press Ctrl-B, execute-script.
For more information, see Leo's scripting tutorial.
@button and @command nodes
@command nodes define a command. Running the command runs a script that can be applied to any outline node. That is, p is bound to the presently selected node, not the @button node. @button nodes work the same way, and also create a button in the @button panel. Pressing that button runs the command. For example, this node defines the print-tree command:
First, set a node's headline to: @command print-tree
And its body text to:
/**
 * Print all headlines of the selected subtree, properly indented,
 * with the number of characters in each node's body text.
 */

// p.self_and_subtree() is a generator yielding p and
// all positions in p's subtree, in outline order.
for (const p of p.self_and_subtree()) {
    const length = p.b.length; // p.b is p's body text.
    const spaces = ' '.repeat(p.level()); // p.level() is p's indentation level.
    const headline = p.h; // p.h is p's headline.

    g.es(`${String(length).padStart(3, ' ')} ${spaces} ${headline}`);
}
See the scripting guide's @button example for more details, and the LeoJS scripting samples for examples of using @button and @rclick nodes.
Summary
Leo is a full-featured outliner with the following special features:
- Directives control how Leo works.
- @file and @clean nodes create external files.
- myLeoSettings.leo specifies your personal settings.
- Plugins extend Leo.
For programmers:
- Leo has an easy-to-use scripting API, giving full access to all data in the outline.
- @button and @command nodes define scripts that can be applied to other nodes.
Leo has hundreds of commands, described in Leo's Command Reference. Please feel free to ask for help in Leo's public forum at any time.